Redirect file to URL IIS

With this rewrite rule in your web.config, it’s possible to redirect a user from a specific file to an internal or external URL.
When they enter http://domain.com/folder/filename.html, they will be redirected to http://www.google.com

Note that this requires you have URL Rewrite installed on your IIS.

Place the following rule inside:
[xml]
<system.webServer>
<rewrite>
<rules>

Your rule goes here…

</rule>
</rules>
</rewrite>
</system.webServer>
[/xml]

Rewrite rule:
[xml]
<rule name="Redirect file to external url" stopProcessing="true">
<match url="^~/folder/filename\.html$" />
<conditions>
<add input="{REQUEST_METHOD}" pattern="^POST$" negate="true" />
</conditions>
<action type="Redirect" url="http://www.google.com" appendQueryString="false" redirectType="Permanent" />
</rule>
[/xml]

Install Ruby on Rails on Windows guide

Install Ruby on Rails on Windows guide

I played around with Ruby on Rails and wanted to set up a developer environment with Rails server and Ruby, but didn’t find any straight forward and easy guides, so I wrote one instead. Following this guide you’ll get going developing and running Ruby in 10 minutes.

Download RubyInstaller and Dev kit from http://rubyinstaller.org/downloads/
If you run 64 bit, remember to get the 64 bit version of both Ruby and dev kit.

Install Rubyinstaller to C:\Ruby
Check “Install Tcl/Tk support”, “Add Ruby executables to your PATH” and “Assosiacte .rb and .rbw files with this Ruby installation”.

Install Ruby on Rails on Windows guide 01

Extract Dev kit to C:\Ruby\DevKit
Open Command Prompt and CD to C:\Ruby\DevKit

Run:

[shell]ruby dk.rb init[/shell]

Install Ruby on Rails on Windows guide 02

Open C:\Ruby\DevKit\config.yml and ensure your Ruby location is included. It’s important that you have a “-” before the path like in the example. Save the file and go back to your Command Prompt.

Install Ruby on Rails on Windows guide 03

Run:

[shell]ruby dk.rb install[/shell]

Install Ruby on Rails on Windows guide 04

Run:

[shell]gem install rails –no-rdoc –no-ri[/shell]

Install Ruby on Rails on Windows guide 05

Create the directory C:\RubyApps

Install Ruby on Rails on Windows guide 06

CD to C:\RubyApps

Run:

[shell]rails new my_app[/shell]

Install Ruby on Rails on Windows guide 07

If you installed the 64 bit version of Ruby, open C:\RubyApps\my_app\Gemfile and replace the tzinfo-data line with:

[xml]gem ‘tzinfo-data’, platforms: [:x64_mingw, :mingw, :mswin][/xml]

. Save the file and return to Command Prompt

Install Ruby on Rails on Windows guide 08

CD to C:\RubyApps\my_app

Run:

[shell]bundle update[/shell]

Install Ruby on Rails on Windows guide 09

You are now done and can run your Rails server
Run:

[shell]rails server[/shell]

Install Ruby on Rails on Windows guide 10

Open up a browser and go to:

[shell]http://localhost:3000[/shell]

Install Ruby on Rails on Windows guide 11

That’s it. Your rails server is running in the Command Prompt window which is handy for development. There are many ways to make Rails run as a Windows Service, in Apache, IIS, etc. Google it if needed. :)

To get started developing your first Ruby application, I highly recommend this guide by Andrea Pavoni.

I found RubyMine by JetBrains to be a very nice IDE for developing Ruby on Rails applications – check it out.

RubyMine

Umbraco ImageGen Razor Helper

With ImageGen for Umbraco you can automatically resize and cache images server side. I presume you already know ImageGen, why this guide won’t dig more into the concepts and functionality here for.

Instead I’ll show you how to make a Razor Helper, with a helper method which returns a processed image.
A Razor Helper is a helper class with methods you can use across your Razor Views.

1. Create a new .cshtml class and place it in /App_Code

2. Reference the following assemblies
[csharp]
@using System.Web.Mvc
@using umbraco.MacroEngines
[/csharp]

3. Create the following helper method

[csharp]

@helper ImageGenNiceUrl(DynamicNode imageNode, int width, int height)
{
//Get image with ImageGen and return just the URL with set width/height
if (imageNode != null)
{
@MvcHtmlString.Create(String.Format("{0}{1}{2}{3}{4}{5}", "/ImageGen.ashx?image=", imageNode.NiceUrl, "&width=", width, "&height=", height))

}
}
[/csharp]

The method takes the parameters DynamicNode, width and height, and returns the image url as a string.
I assume you have ImageGen installed and placed ImageGen.ashx in the root of your website, otherwise change the first parameter in String.Format to the appropriate.
We need to use MvcHtmlString.Create, otherwise “&” will be returned as: [html]&amp;[/html] and ImageGen won’t recognize the parameters.

ImageGen supports several other parameters, so you can extend the method as desired. This is just to show you the basics.

Our helper method is now done, and we can use it in our Razor Views.

4. Example:
[csharp]
<img src="@LayoutHelper.ImageGenNiceUrl(currentNode.Media("imagePicker"), 128, 256)" />
[/csharp]

currentNode reflects a DynamicNode, which contains a image picker with the property name “imagePicker”.
128 (width), 256 (height) is the proportions we want our image to be.

If you provide width and height with 0 value for both parameters, the image won’t be scaled. Providing 0 for just one of the parameters, will scale the opposite parameter.
You can choose to include [html]<img></img>[/html] in your helper, but I prefer it this way, as it makes it very easy to extend with eg. class, data or other properties.

If you want to read more about Razor Helpers, check out this post by Scott Gu.

Solr schema.xml stroed/indexed

When defining fields in Solr schema.xml we can define whether we should be able to only search, show or both search and show data in the fields.
Setting the attribute stored=true means that the field will be shown in the search result. Indexed=true means we can search the field.

Sometimes we want to display data in the search result, but it’s not necessary to be able to search the field. This can be accomplished by setting the field attributes to
[xml]
stored=true indexed=false
[/xml]

IP restrict Azure website

As for now, it’s not possible to IP/Domain restrict an Windows Azure website from the administration portal. You’ll have to add security rules yourself to web.config associated with your website.

Go to system.webServer section of your web.config and add a security element, if you don’t already have it.
Inside you can configure security rules; “ipsecurity”.
Add the IP address and subnet mask for those IP addresses you want to allow access to your website.
If you need to allow several IP’s, simply duplicate the “ipsecurity” element and edit the IP address.

[xml]
<system.webServer>
<security>
<ipsecurity allowUnlisted="false" denyAction="NotFound">
<add allowed="true" ipAddress="8.8.8.8" subnetMask="255.255.255.0"></add>
</ipsecurity>
</security>
</system>
[/xml]

Gist: https://git.io/vrrEQ/a>

Point your own domain to Windows Azure Web Site

Pointing your own domain name to your Windows Azure Web Site is fairly simple and fast, if you know how to. A place where people go wrong or find it difficult is regarding setting up DNS. I’ll try to narrow it down.

Start by logging into Windows Azure portal and head to your website. If you are running a free website, you’ll have to first scale it to either a shared or standard plan. Do this by clicking “Scale” on the top menu, and choose your desired plan.

Windows Azure domain

Now go to the “Configure” tab and press “manage domains”

Windows Azure domain

This popup will tell you instructions how to do, but these can be a bit tricky to understand. What is says, is Windows Azure needs to verify you are the domain name owner of your desired domain. This can be done by adding a CNAME-record to your DNS called awverify.domain.com

Furthermore we will have to point our A-record to the IP address stated in the popup if we want domain.com to redirect to our Windows Azure website. I’m not interested in that to start with. Instead I want azure.egeek.dk to point to my Windows Azure website, where as egeek.dk points to my own webserver.

Let’s head over to our DNS configuration. I’m using GratisDNS, but it doesn’t matter which you use. Configuration can look a bit different depending on your DNS host, but settings are the same.

Because I don’t want egeek.dk to point to Azure but my own server, I have given my servers IP as a-record. If you want domain.com to point to Azure, simply create a a-record with the IP address stated in the popup I mentioned previously.

Windows Azure domain

As for the CNAME, it is here we have to make a record, so Windows Azure can verify we are the domain owners. Secondly, it’s also here I create my subdomain pointing to Windows Azure.

Windows Azure domain

As you can see, I have created awverify.egeek.dk to point to egeek.azurewebsites.net – this is needed to make it possible for Windows Azure to verify I own the domain egeek.dk.
Secondly I have created azure.egeek.dk and pointed it to egeek.azurewebsites.net, making it possible to hit my Windows Azure website, when going to azure.egeek.dk.

That’s it. Keep in mind that DNS servers have to update before Windows Azure portal can register changes. Usually it takes a few minutes, but can take up to hours. If Windows Azure can not verify your domain within an hour, possibilities are, that you most likely did something wrong.

To check if DNS settings have passed through, we can bring up Command Line or Terminal.

1. “nslookup”
2. azure.egeek.dk

This will give us the output:

Windows Azure domain

This tells us the IP address and hostname the domain is pointing at. Keep in mind this is the DNS we are connected through. DNS servers has to transfer data to each other, so either ours or Windows Azure’s DNS might not have gotten the changed yet.

You can test other DNS servers, eg. Google’s DNS, by typing “server 8.8.8.8” followed by “azure.egeek.dk”

Windows Azure domain

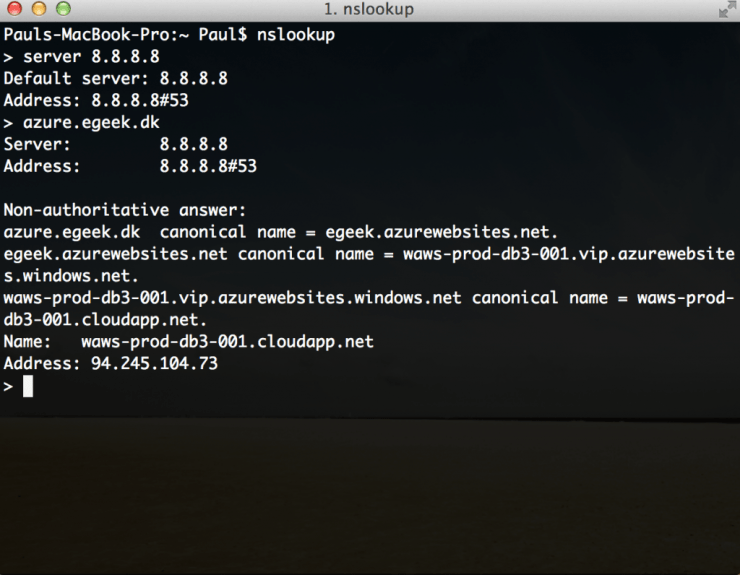
As you can see, we are now using the DNS 8.8.8.8 (Google), and both DNS servers receive the same data.

Lets head back to Windows Azure portal > Web Sites > our website > Configure > manage domains
Type in your domain or subdomain, in my case azure.egeek.dk and click the accept button.

Windows Azure domain

If Windows Azure has registered DNS changes, you should now be able to point the domain / subdomain to your Windows Azure website.

Want to know more about setting up DNS records to point at Windows Azure, watch this Azure Friday video with Scott Hanselman and Stefan Schackow.

Create Windows Azure Web Site

If you haven’t played around with Windows Azure yet, head to their signup page and get a free 3 months trial account (Google it).
Even after your trial is expired, you’ll still be able to create 10 free websites per data center (meaning, more than 10, technically).

Windows Azure lets you easily create websites in the matter of seconds, where after you can deploy your content very fast with Web Deploy in Visual Studio or Webmatrix, from a git repository and through ftp, to name some of the possibilities. It’s a convenient way to test your code or even run sites, depending on your website settings and goals.

Free websites are restricted to run as a subdomain under azurewebsites.net – eg. azurerockz.azurewebsites.net. To map your own domain name to your Azure website, you’ll have to scale your website to either a shared or standard plan (more about that in another topic).

Let’s create our first website!
1. Log into Azure portal by going to https://manage.windowsazure.com

2. Click the big plus icon on the bottom left

3. Compute > Web Site > Quick Create

4. Pick a web site name and choose region (data center) and click “Create Web Site”
(Choose a region where your target audience is located, and remember to choose same region when creating a SQL database. This will make your traffic between website and SQL server free and of course improve performance.)

Windows Azure

In the matter of seconds your website is created and up running. You can see your running sites by clicking “Web Sites” in the menu to the left

Windows Azure

Heading to your newly created website, will show you this welcome screen with help on how to publish content

Windows Azure

In the Azure portal under Web Sites, click your newly created website and go to “Dashboard”. Here you’ll get an overview of resources used and other options. Try to click “Download the publish profile”. This profile contains login credentials for your website. You can either import the profile in Visual Studio or Webmatrix when you publish your site, or you can open it with your favourite text editor. The file contains hostname, username and password to use with FTP.

Windows Azure

This is how the publish profile file looks like. I have marked out the hostname, username and password.

Windows Azure

Umbraco Contour XSLT transformed mail with link

Umbraco Contour seem to have a bug when sending mail out with a file upload. You would expect to get a clickable link in the email, but instead Contour inserts the file location without domain – as plain text, making it rather useless. Of course you can see the uploaded file from “Entries” in Contour, but a better and expected UX would be to be able to click the link in the mail.

As for now, this can only be done by using the type “Send xslt transformed email” from “Workflows” in Contour. Using the below XSLT file will give you a clickable link with the filename, in your received email.

When creating a “Workflow”, simply choose the type “Send xslt transformed email” and choose the XSLT file below.

[xml]
<?xml version="1.0" encoding="utf-8"?>
<xsl:stylesheet version="1.0"
xmlns:xsl="http://www.w3.org/1999/XSL/Transform"
xmlns:msxsl="urn:schemas-microsoft-com:xslt"
xmlns:user="urn:my-scripts"
xmlns:umbraco.library="urn:umbraco.library"
exclude-result-prefixes="xsl msxsl user umbraco.library">

<xsl:output method="html" media-type="text/html" doctype-public="-//W3C//DTD XHTML 1.0 Strict//EN"
doctype-system="DTD/xhtml1-strict.dtd"
cdata-section-elements="script style"
indent="yes"
encoding="utf-8"/>

<xsl:param name="records" />

<xsl:template match="/">
<table style="border-collapse:collapse;border:1px solid black;">
<xsl:for-each select="$records//fields/child::*">
<xsl:sort select="@sortorder" data-type="number"/>
<tr style="border:1px solid black;">
<td valign="top" style="border:1px solid black;padding:5px;font-family:Verdana,Helvetica,Arial,sans-serif;font-size:11px;">
<strong>
<xsl:value-of select="./caption"/>
</strong>
</td>
<td valign="top" style="border:1px solid black;padding:5px;font-family:Verdana,Helvetica,Arial,sans-serif;font-size:11px;">
<xsl:choose>
<xsl:when test="contains(.//value, ‘/umbraco/plugins/umbracoContour/files/’)">
<a href="http://{umbraco.library:RequestServerVariables(‘SERVER_NAME’)}{.//value}">
<xsl:value-of select="substring-after(substring-after(.//value, ‘/files/’), ‘/’)"/>
</a>
</xsl:when>
<xsl:otherwise>
<xsl:for-each select="./values/value">
<xsl:if test="position() &gt; 1">
<br />
</xsl:if>
<xsl:value-of select="umbraco.library:ReplaceLineBreaks(.)"/>
</xsl:for-each>
</xsl:otherwise>
</xsl:choose>
</td>
</tr>
</xsl:for-each>
</table>
</xsl:template>
</xsl:stylesheet>
[/xml]

https://gist.github.com/PaulSorensen/7983503