Individual meta description Umbraco

As for SEO, it’s good practise to have individual meta descriptions for most if not all pages on your site.
A quick and easy way to implement this into Umbraco, is by creating a SEO tab with the property “meta-description” (textstring) for all your document types.

In your template you simply insert following line into your <head></head>
[code]
<meta name="description" content="<umbraco:Item field=’meta-description’ recursive=’true’ runat=’server’/>"/>
[/code]
Use Enter as Tab in Windows Forms

Recently I made a Windows Form Application with a lot of text boxes for my work.
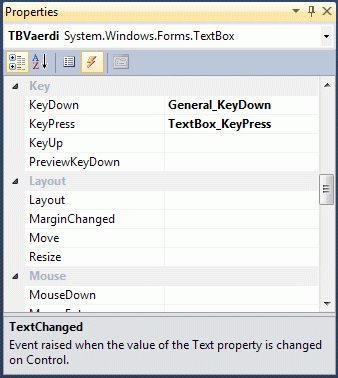
After hours of use and testing, we found out it would be more efficient if it was possible to tab from box to box hitting ‘enter’ instead of the tabulator key. Even though you by standard can’t assign it in Visual Studio, it’s actually fairly easy to implement.

All you need to make is one event handler and assign your text boxes ‘KeyDown’ action to use the handler.

[csharp]
//Event handler to handle ENTER as TAB in TextBoxes
private void General_KeyDown(object sender, KeyEventArgs e)
{
if (e.KeyCode == Keys.Enter)
{
this.ProcessTabKey(true);
}
}
[/csharp]

Select your Text Boxes, go to the properties windows and select the lightning icon. Scroll down to “Key”. Under ‘KeyDown’ select your newly created event handler “General_KeyDown’.

Use Enter as Tab in Windows Forms

Group radio buttons in Windows Form

To have multiple groups of radio buttons that should not affect each other, it is necessary to group them as a GroupBox or Panel.

In Visual Studio, open your toolbox, scroll down to “Containers” and choose your box / panel. All radio buttons in this box / panel will now be interconnected.

Group radio buttons

Clear all TextBoxes

This loop function will clear all TextBoxes in your Form, wherever they are placed.
Comes in handy when creating a “Clear fields” button

[csharp]
private void button1_Click(object sender, EventArgs e)
{
RecursiveClearTextBoxes(this.Controls);
}

private void RecursiveClearTextBoxes(Control.ControlCollection cc)
{
foreach (Control ctrl in cc)
{
TextBox tb = ctrl as TextBox;
if (tb != null)
tb.Clear();
else
RecursiveClearTextBoxes(ctrl.Controls);
}
}
[/csharp]

An error occurred during the parsing of a resource required to service this request

I suddenly got this error in my ASP.NET Web Forms project in Visual Studio. Even after creating a new Web Form without content, I was thrown this error. The solution was very simple. All you have to do is rebuild your project.

Server Error in ‘/’ Application.


Parser Error

Description: An error occurred during the parsing of a resource required to service this request. Please review the following specific parse error details and modify your source file appropriately.

Parser Error Message: Could not load type ‘Listing’.

Source Error:

Line 1: <%@ Page Language=”C#” AutoEventWireup=”true” CodeBehind=”8-8_Listing.aspx.cs” Inherits=”Listing” %> Line 2:
Line 3: <!DOCTYPE html PUBLIC “-//W3C//DTD XHTML 1.0 Transitional//EN”
“http://www.w3.org/TR/xhtml1/DTD/xhtml1-transitional.dtd”>


Source File: /8-8_Listing.aspx Line: 1

Create MySQL user and database

Users can be created in several ways in MySQL. Eg. via phpMyAdmin or Command Line Client, which I prefer and will demonstrate.

Open up Command Line Client and enter your root password to login.

You should now get the welcome screen and be in mysql>_

We are now ready to create our database and associated user.

CREATE DATABASE mydatabase; [Enter]
GRANT ALL PRIVILEGES on mydatabase.* to myuser@localhost identified by ‘userpassword’; [Enter]
FLUSH PRIVILEGES; [Enter]

That’s it, you are now ready to use your database.
Usually I use domain_com as database and username for a better overview.