iTerm ANSI colors not working

I’m using iTerm 2 as a replacement for the standard terminal in OS X. It comes with a lot of nice features and advantages over the standard terminal. For instance it’s easy to change color schemes, you can find several of online.

However, ls output with colors ( ls -G) is not default, which is why you have to make an alias for “ls” pointing to “ls -G”.

[code]
echo "alias ls=’ls -G’" >> ~/.bashrc
source ~/.bashrc
[/code]

If you still have problems displaying the colors, open Prefrences > Profiles > Terminal and set “Report Teminal Type” to “xterm-256color”.

iTerm ANSI colors not working

iOS 7 install and preview

Apple iOS 7 got announced at this years WWDC (Worldwide Developers Conference) the 10th of June 2013.

If you have a iOS Developer account you can already now download and install the beta on your iPhone. If not, there are several other ways to get iOS 7 on your iPhone. Just do a Google search on “Install iOS 7 guide“.
NB: Remember to have your UDID ready and activated on your (or a friends) iOS Developer account, before installing iOS 7, otherwise you’ll have to downgrade to iOS 6 – find out how here.

I just installed iOS 7 on my iPhone 5 and so far it’s working flawlessly. Here are some screenshots.

iOS 7, iPhone 5  iOS 7, iPhone 5  iOS 7, iPhone 5  iOS 7, iPhone 5  iOS 7, iPhone 5  iOS 7, iPhone 5  iOS 7, iPhone 5  iOS 7, iPhone 5  iOS 7, iPhone 5  iOS 7, iPhone 5  iOS 7, iPhone 5  iOS 7, iPhone 5  iOS 7, iPhone 5  iOS 7, iPhone 5  iOS 7, iPhone 5  iOS 7, iPhone 5  iOS 7, iPhone 5  iOS 7, iPhone 5  iOS 7, iPhone 5  iOS 7, iPhone 5  iOS 7, iPhone 5  iOS 7, iPhone 5  iOS 7, iPhone 5  iOS 7, iPhone 5  iOS 7, iPhone 5  iOS 7, iPhone 5 iOS 7, iPhone 5 iOS 7, iPhone 5 iOS 7, iPhone 5 iOS 7, iPhone 5 iOS 7, iPhone 5

Ipconfig Mac OS X

How to get your local IP address with Ipconfig equivalent for Mac OS X

Ipconfig Mac – Just like you you can open command prompt in Windows and hit “ipconfig” to get your local LAN/WLAN IP address, you have the same option on a Mac in OS X with the command “ifconfig”.

Simply open up the terminal, eg. by pressing cmd+space and typing “terminal”.
Then type “ifconfig” and hit enter.

Ipconfig Mac OS X

How to get your local IP address from System Preferences

Another option to get your local IP address on a Mac is to click the Apple logo in the taskbar,  then click “System Preferences”, type “Network” and hit enter. This will open up a graphical view, which shows you your local IP address as illustrated:

Ipconfig Mac OS X

Grant AD user sysadmin access to SQL Server

In this guide i’ll show how to grant a Active Directory user access to SQL Server with sysadmin privileges.

We have 2 servers – Dev01 running Active Directory Domain Server (AD DS) and Dev02 running SQL Server.
I would like to grant a specific user on the domain sysadmin access to the SQL Server.

Open ssms (SQL Management Studio) on Dev02 and login as administrator (Windows Authentication) or with the build in sa account, depending on what settings you did chose when installing SQL Server.

Grant AD user sysadmin access to SQL Server

Expand the Security folder, right click on “Logins” and chose “New Login”

Grant AD user sysadmin access to SQL Server

Click “Search” under login name and “Advanced” in the new window that’ll appear

Grant AD user sysadmin access to SQL Server

Click “Locations”

Grant AD user sysadmin access to SQL Server

Chose “Entire Directory” instead of machine name (DEV02), to search the domain. Click “OK”

Grant AD user sysadmin access to SQL Server

Click “Find Now” to get a list of all available users. Choose the user you want to grant access, and click “OK”

Grant AD user sysadmin access to SQL Server

Right click the newly created user and choose “Properties”. Go to the “Server Roles” tab.

Grant AD user sysadmin access to SQL Server

Check “sysadmin” and click “OK”.
The user is now granted sysadmin rights to the SQL Server.

Fastest way to delete large folders in Windows

Deleting a folder with thousands or even millions of subfolders and files can be a rather slow process in Windows. Deleting the files normally from the GUI, requires you to empty the recycle bin afterwards, which takes quite some time too. Shift-deleting is faster than deleting and emptying the recycle bin, but also takes a lot of time, as Windows will first index all the files that need to be deleted.

The fastest way to delete folders and files is to make a bat-file with the following 2 lines, specifying what folder you want to delete.

Using this method rather than deleting from the GUI or using “rmdir /s/q foldername” can save you hours of waiting time, depending on your folder/file structure.

[code]
del /f/s/q foldername > nul
rmdir /s/q foldername
[/code]

Configure / demote Active Directory Windows Server 2012

This tutorial will explain how to install and configure Active Directory (AD DS) under Windows Server 2012
http://sharepointgeorge.com/2012/configuring-active-directory-ad-ds-in-windows-server-2012/

Configure Active Directory Windows Server 2012

If you by accident configured you Active Directory (AD) with a wrong domain controller, you can demote / remove if by navigating to server roles > Remove Roles and Features > Active Directory Domain Services > Next, and you’ll be prompted with a validation error, where you can click “Demote this domain controller”. Choose this option and run the wizard. This will not uninstall the Active Directory service itself, but only the installed domain controller (domain.com).
http://techibee.com/active-directory/demoting-a-active-directory-domain-controller-in-windows-2012/1836

Run URL from ASP.NET/C#

Sometimes it can be handy to run a URL from a ASP.NET page (eg. aspx, ascx or MVC control). It could be simply executing one or more webservices, without wanting a result back.

It’s actually pretty simple!

[csharp]
string url = "http://egeek.dk/service.ashx";
using (System.Net.WebClient client = new System.Net.WebClient())
{
client.DownloadString(url);
}
[/csharp]

Redirect www to non-www IIS

This guide shows you how to redirect your site from www to non-www on server level with IIS 7.5.

www is actually a subdomain for your main domain (domain.com), which means both www.domain.com and domain.com will serve the same content, if you don’t redirect either www.domain.com to domain.com or the opposite way around. It’s highly recommended to do so, to prevent duplicate content. Which you prefer is entirely up to you, as it doesn’t matter in search engine rankings, as long as you choose one.

Fire up Internet Information Services (IIS) Manager by hitting CTRL+R and type inetmgr [enter]

Choose your site in the left menu and open up “Url Rewrite

Redirect www to non-www IIS

Click “Add rule(s)…”

Choose “Blank rule” under Inbound rules and click [ok]

Redirect www to non-www IIS

Give your rule a name, eg.: Redirect to non-www
Request URL: Match the Pattern
Pattern: (.*)

Open up the “Conditions” tab

Redirect www to non-www IIS

Condition input: {HTTP_HOST}
Check if input string: Does Not Match the Pattern
Pattern: ^domain\.com$ 

Redirect www to non-www IIS

Scroll down to the “Action” tab

Action type: Redirect
Redirect URL: http://domain.com/{R:1}
Make sure Redirect type is set to “Permanent (301)

Redirect www to non-www IIS

Done!

Another option, is to add the rule in your web.config manually:

[xml]
<rewrite>
<rules>
<rule name="Redirect to non-www" stopProcessing="true">
<match url="(.*)" negate="false"></match>
<action type="Redirect" url="http://domain.com/{R:1}"></action>
<conditions>
<add input="{HTTP_HOST}" pattern="^domain\.com$" negate="true"></add>
</conditions>
</rule>
</rules>
</rewrite>
[/xml]

The SQL-Server database could not be opened Dynamicweb

[code]
Please wait!
The SQL-Server database could not be opened (”) – the error is:
System.Data.SqlClient.SqlException (0x80131904): Login failed for user ”.
[/code]

Ever ran into this problem with Dynamicweb, and thought you had set up everything correctly?
Well, I had to set up IIS, SQL Server and a new local installation of Dynamicweb up on a new machine.

Installed IIS8 and SQL Server Express 2012.
I created a new website in IIS and pointed it to the application folder as well as a virtual directory for the files folder.
Edited files\GlobalSettings.aspx

[code]
<password>mypass</password>
<type>ms_sqlserver</type>
<username>myuser</username>
<database>mydatabase</database>
<sqlserver>.\sqlexpress</sqlserver>
<integratedsecurity>false</integratedsecurity>
[/code]

I downloaded and restored the DefaultEmptyData8SQL.zip database from developer.dynamicweb-cms.com
Mapped “myuser” to the database and gave it following database roles: db_datareader, db_datawriter, db_ddladmin and public.

Even though, I still got this error.
One thing I forgot, was to enable “SQL Server and Windows Authentication mode”, as this was a new installation of SQL Server.

Here’s how to do it, if you didn’t enable it in the installation process:

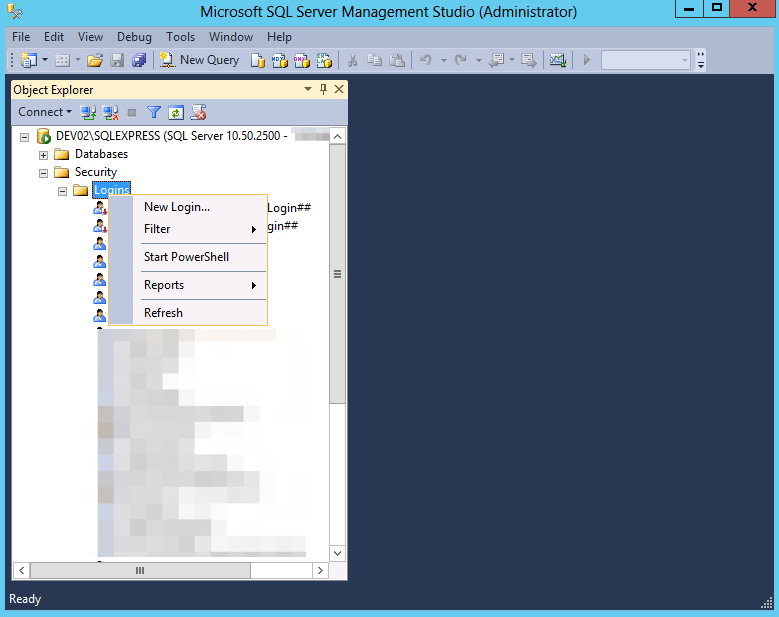
Go into SQL Server Management Studio – Win+R type ssms [Enter]
Right click your SQL instance – mine is called “.\sqlexpress (SQl Server version number – User\PC-Name)
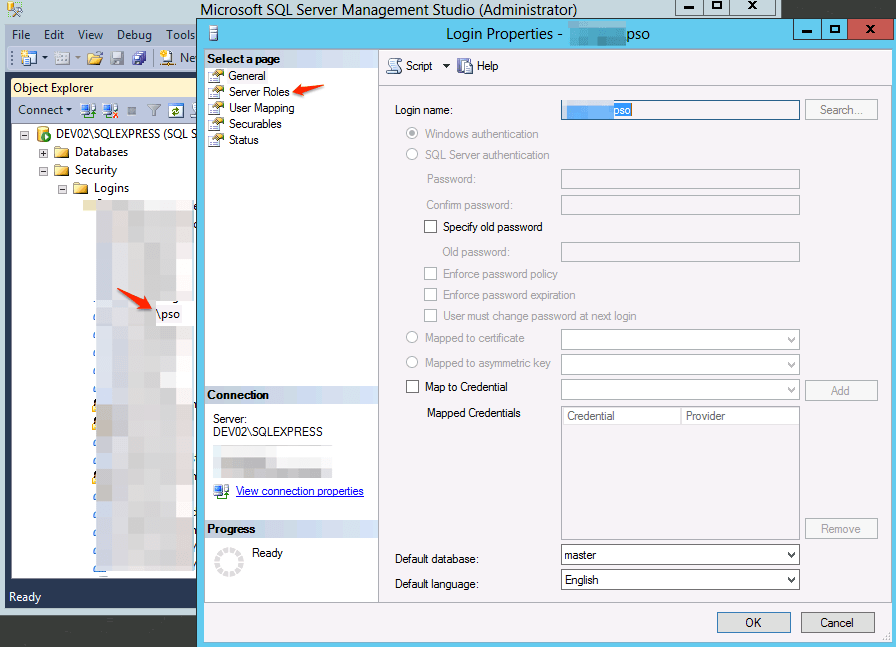
Click on “Properties”, Go into “Security” chose “SQL Server and Windows Authentication mode” and then click [Ok]

SQL Server and Windows Authentication Mode

You’ll need to restart your SQL Server for the changes to take effect:

Win+R – cmd [Enter]
Stop and start SQL Server (Express)

[code]net stop mssq$sqlexpress[/code]

[code]net start mssql$sqlexpress[/code]

Taadaa! :)

Create and pull from shared repository with Git in 5 steps

Earlier, I have been using Mercurial for source control, but at my new job, we decided to go with Git. Even though both solutions are much alike, there’s still new stuff to be learned and explored. I’ll try to post some guides and tips as I adventure into the world of Git.

First a quick 5 step guide to create a shared repository on your local disk or network drive, and then pull it to your working directory.

Create repository:
X:\Projects\git init --bare test_project.git

Pull repository:
C:\Projects\git clone file://X:/Projects/test_project.git
Put files into your repository

git add .
git commit -a -m"Initial commit"
git push

That’s basically it!
I’ll post a more in depth guide with explanations later on.