Two simple commands to either log off or restart the server from Windows PowerShell
Log off:
[code]logoff[/code]
Restart server:
[code]restart-computer[/code]
Web development and technologies | egeek
ASP.NET, C#, Azure, SQL, Server, Umbraco, Sitecore, Git and other stuff I find useful
Two simple commands to either log off or restart the server from Windows PowerShell
Log off:
[code]logoff[/code]
Restart server:
[code]restart-computer[/code]
Your index is stored in \Solr\core\data
Eg. \Solr\collection1\data
If you delete the data folder or underlying folders “index” and “tlog”, it will delete your index.

A nicer way of achieving this, is by running the following HTTP command
[code]http://localhost:8983/solr/collection1/update?stream.body=<delete><query>*:*</query></delete>[/code]
Solr HTTP admin interface is per default unprotected and can be accessed by everyone.
To secure the interface with HTTP web authentication follow these steps.
Open:
[shell]C:\Tomcat\webapps\solr\WEB-INF\web.xml[/shell]
After:
[xml]<web-app xmlns="http://java.sun.com/xml/ns/javaee"
xmlns:xsi="http://www.w3.org/2001/XMLSchema-instance"
xsi:schemaLocation="http://java.sun.com/xml/ns/javaee http://java.sun.com/xml/ns/javaee/web-app_2_5.xsd"
version="2.5"
metadata-complete="true">[/xml]
Insert:
[xml]<security-constraint>
<web-resource-collection>
<web-resource-name>
Solr Lockdown
</web-resource-name>
<url-pattern>/</url-pattern>
</web-resource-collection>
<auth-constraint>
<role-name>solr_admin</role-name>
<role-name>admin</role-name>
</auth-constraint>
</security-constraint>
<login-config>
<auth-method>BASIC</auth-method>
<realm-name>Solr</realm-name>
</login-config>
<security-role>
<description>solr users</description>
</security-role>[/xml]
Open:
[shell]C:\Tomcat\conf\tomcat-users.xml[/shell]
Inside [xml]<tomcat-users> </tomcat-users>[/xml] insert:
[xml]<user name="myUsername" password="myPassword" roles="admin-gui,manager-gui,solr_admin"></user>[/xml]
After setting Solr DataImportHandler up and trying to fetch data from SQL Server via the HTTP API (http://localhost:8080/solr/dataimport?command=full-import) I got an error response back, telling all changes had been rolled back.
[code]
<response>
<lst name="responseHeader">
<int name="status">0</int>
<int name="QTime">7</int>
</lst>
<lst name="initArgs">
</lst><lst name="defaults">
<str name="config">data-config.xml</str>
</lst>
<str name="command">full-import</str>
<str name="status">idle</str>
<str name="importResponse"></str>
<lst name="statusMessages">
<str name="Time Elapsed">0:1:19.495</str>
<str name="Total Requests made to DataSource">1</str>
<str name="Total Rows Fetched">0</str>
<str name="Total Documents Processed">0</str>
<str name="Total Documents Skipped">0</str>
<str name="Full Dump Started">2013-08-14 11:20:59</str>
<str name="">Indexing failed. Rolled back all changes.</str>
<str name="Rolledback">2013-08-14 11:21:28</str>
</lst>
<str name="WARNING">
This response format is experimental. It is likely to change in the future.
</str>
</response>
[/code]
The Catalina log didn’t tell me anything useful, but checking “Logging” in http://localhost:8080/solr/ threw:
[code]
WARN SimplePropertiesWriter Unable to read: dataimport.properties
[/code]
It simply says that Solr is unable to read the file dataimport.properties.
The file is not a part of the standard Solr package and is not created automatically.
To fix this warning, simply created an empty file called “dataimport.properties” in your Solr conf directory, eg. /Solr/collection1/conf/ and make sure Apache has write access to it.
Getting these error messages in Apache Solr administration interface when you tab logging?
Well, it’s most likely because you are using the example solrconfig.xml located in \Solr\Collection1\conf\solrconfig.xml.
Simply modify or out comment the following lines:
[code]
<lib dir="../../../contrib/extraction/lib" regex=".*\.jar"></lib>
<lib dir="../../../dist/" regex="solr-cell-\d.*\.jar"></lib>
<lib dir="../../../contrib/clustering/lib/" regex=".*\.jar"></lib>
<lib dir="../../../dist/" regex="solr-clustering-\d.*\.jar"></lib>
<lib dir="../../../contrib/langid/lib/" regex=".*\.jar"></lib>
<lib dir="../../../dist/" regex="solr-langid-\d.*\.jar"></lib>
<lib dir="../../../contrib/velocity/lib" regex=".*\.jar"></lib>
<lib dir="../../../dist/" regex="solr-velocity-\d.*\.jar"></lib>
[/code]
You can find a issue ticket about this problem at Solr issue tracker.
Installing and getting Solr up and running is straight forward, as long as you follow these simple steps. I ran into problems myself trying to get Solr starting up under Tomcat, even after reading several posts explaining how to, which is why I wrote this post, explaining all the necessary steps. Feel free to make a comment, if you have any questions or run into problems.
1. Download Apache Tomcat from Apache Software Foundation. I downloaded and installed Tomcat 7.0.42 “32-bit/64-bit Windows Service Installer” under the location c:\Tomcat\
2. Download the latest version of “Solr”. I downloaded Solr 4.4.0.
– Open solr-4.4.0.zip, navigate to \example\solr and extract the directories and files to c:\solr\, so it contains; bin, collection1, README.txt, solr.xml and zoo.cfg
– Again in solr-4.4.0.zip navigate to \example\lib and extract all the jar-files into c:\Tomcat\lib\. Repeat the same procedure with the jar-files in \examples\lib\ext.
– In solr-4.4.0.zip navigate to \example\webapps and extract solr.war to c:\Tomcat\webapps\. If the file is called solr-versionNumber.war, rename it to solr.war
3. In C:\Tomcat\conf\Catalina\localhost create a file called “solr.xml” with following content, where you specify Solr docBase “c:/Tomcat/webapps/solr.war” and enviroment value “/Tomcat/webapps/”.
[xml]
<?xml version="1.0" encoding="UTF-8"?>
<context docBase="c:/Tomcat/webapps/solr.war" debug="0" crossContext="true" >
<environment name="solr/home" type="java.lang.String" value="/Tomcat/webapps/" override="true"></environment>
</context>
[/xml]
4. Open up C:\Tomcat\webapps\solr\WEB-INF\web.xml and uncomment the following and replace “/put/your/solr/home/here” with your solr location
[xml]
<env-entry>
<env-entry-name>solr/home</env-entry-name>
<env-entry-value>C:\Solr</env-entry-value>
<env-entry-type>java.lang.String</env-entry-type>
</env-entry>
[/xml]
During these steps you might have to stop and start your Apache Tomcat to be able to write to the files and reload the changes. To stop/start Apache Tomcat, click the Apache icon in the task bar and click “Stop service / Start service”.

You should now be able to navigate to http://localhost:8080/solr/ and get the Solr admin site, presuming you installed Apache Tomcat on port 8080 (as per default)

If you run into problems, you can view the Catalina log located in c:\Tomcat\logs\catalina.date.log.
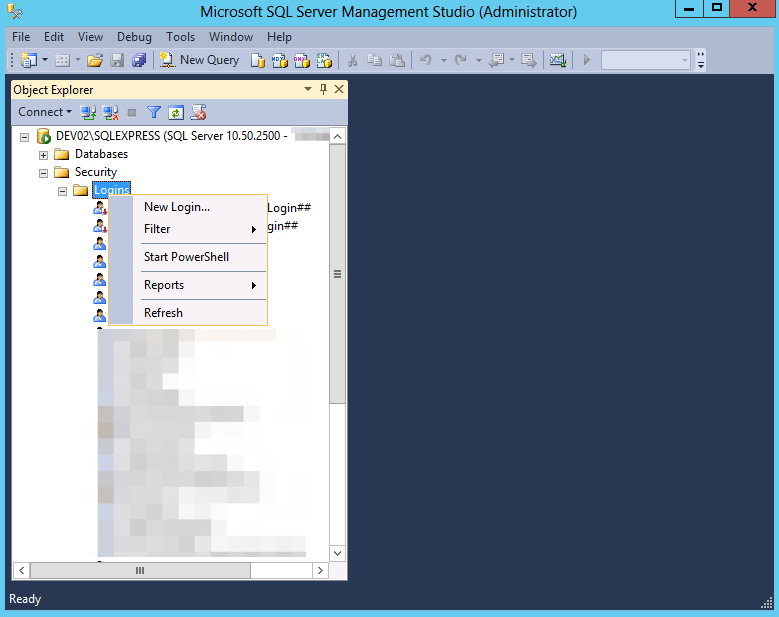
In this guide i’ll show how to grant a Active Directory user access to SQL Server with sysadmin privileges.
We have 2 servers – Dev01 running Active Directory Domain Server (AD DS) and Dev02 running SQL Server.
I would like to grant a specific user on the domain sysadmin access to the SQL Server.
Open ssms (SQL Management Studio) on Dev02 and login as administrator (Windows Authentication) or with the build in sa account, depending on what settings you did chose when installing SQL Server.

Expand the Security folder, right click on “Logins” and chose “New Login”

Click “Search” under login name and “Advanced” in the new window that’ll appear

Click “Locations”

Chose “Entire Directory” instead of machine name (DEV02), to search the domain. Click “OK”

Click “Find Now” to get a list of all available users. Choose the user you want to grant access, and click “OK”

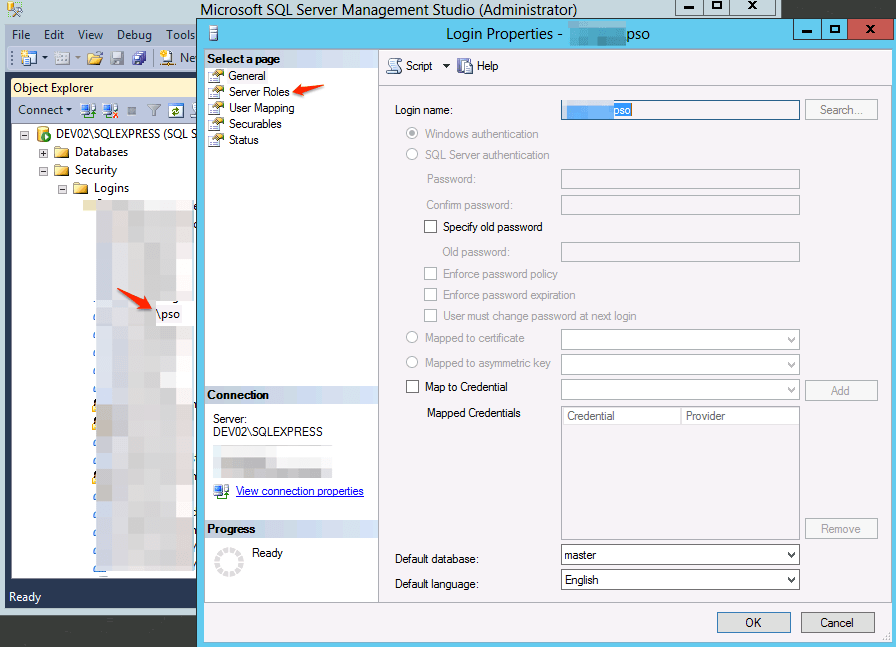
Right click the newly created user and choose “Properties”. Go to the “Server Roles” tab.

Check “sysadmin” and click “OK”.
The user is now granted sysadmin rights to the SQL Server.
Deleting a folder with thousands or even millions of subfolders and files can be a rather slow process in Windows. Deleting the files normally from the GUI, requires you to empty the recycle bin afterwards, which takes quite some time too. Shift-deleting is faster than deleting and emptying the recycle bin, but also takes a lot of time, as Windows will first index all the files that need to be deleted.
The fastest way to delete folders and files is to make a bat-file with the following 2 lines, specifying what folder you want to delete.
Using this method rather than deleting from the GUI or using “rmdir /s/q foldername” can save you hours of waiting time, depending on your folder/file structure.
[code]
del /f/s/q foldername > nul
rmdir /s/q foldername
[/code]
This tutorial will explain how to install and configure Active Directory (AD DS) under Windows Server 2012
http://sharepointgeorge.com/2012/configuring-active-directory-ad-ds-in-windows-server-2012/

If you by accident configured you Active Directory (AD) with a wrong domain controller, you can demote / remove if by navigating to server roles > Remove Roles and Features > Active Directory Domain Services > Next, and you’ll be prompted with a validation error, where you can click “Demote this domain controller”. Choose this option and run the wizard. This will not uninstall the Active Directory service itself, but only the installed domain controller (domain.com).
http://techibee.com/active-directory/demoting-a-active-directory-domain-controller-in-windows-2012/1836
This guide shows you how to redirect your site from www to non-www on server level with IIS 7.5.
www is actually a subdomain for your main domain (domain.com), which means both www.domain.com and domain.com will serve the same content, if you don’t redirect either www.domain.com to domain.com or the opposite way around. It’s highly recommended to do so, to prevent duplicate content. Which you prefer is entirely up to you, as it doesn’t matter in search engine rankings, as long as you choose one.
Fire up Internet Information Services (IIS) Manager by hitting CTRL+R and type inetmgr [enter]
Choose your site in the left menu and open up “Url Rewrite”

Click “Add rule(s)…”
Choose “Blank rule” under Inbound rules and click [ok]

Give your rule a name, eg.: Redirect to non-www
Request URL: Match the Pattern
Pattern: (.*)
Open up the “Conditions” tab

Condition input: {HTTP_HOST}
Check if input string: Does Not Match the Pattern
Pattern: ^domain\.com$

Scroll down to the “Action” tab
Action type: Redirect
Redirect URL: http://domain.com/{R:1}
Make sure Redirect type is set to “Permanent (301)”

Done!
Another option, is to add the rule in your web.config manually:
[xml]
<rewrite>
<rules>
<rule name="Redirect to non-www" stopProcessing="true">
<match url="(.*)" negate="false"></match>
<action type="Redirect" url="http://domain.com/{R:1}"></action>
<conditions>
<add input="{HTTP_HOST}" pattern="^domain\.com$" negate="true"></add>
</conditions>
</rule>
</rules>
</rewrite>
[/xml]
