To check if a user exist in the Umbraco membership section, we use the ASP.NET Membership API.
[csharp]
var userName = "myUserName";
var memberExist = false;
if(Membership.GetUser(userName) != null)
{
memberExist = true;
}
[/csharp]
Web development and technologies | egeek
ASP.NET, C#, Azure, SQL, Server, Umbraco, Sitecore, Git and other stuff I find useful
To check if a user exist in the Umbraco membership section, we use the ASP.NET Membership API.
[csharp]
var userName = "myUserName";
var memberExist = false;
if(Membership.GetUser(userName) != null)
{
memberExist = true;
}
[/csharp]
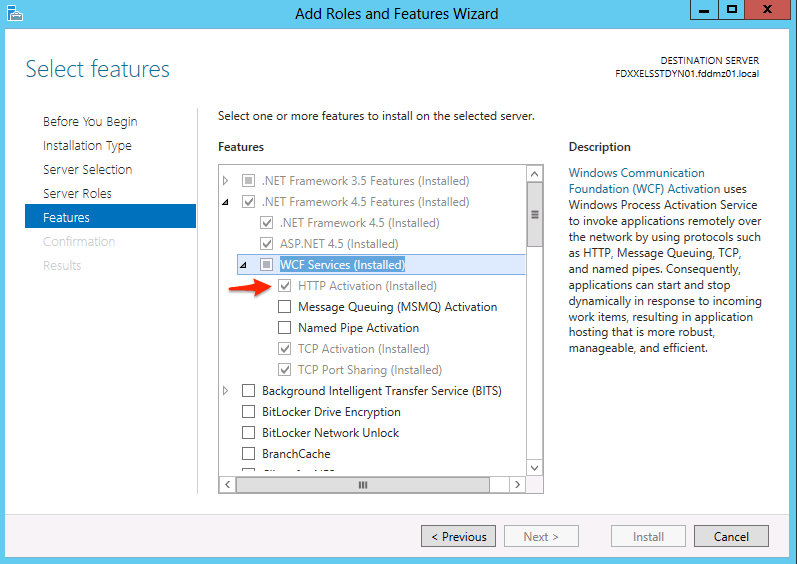
If you didn’t install HTTP-Activation for WCF Services, you will get a 404 error when trying to access your service directly.
To be able to run HTTP WCF Services, do as follows:
1. Run Server Manager from your task bar or start menu
2. Choose the server you want to install WCF on
3. Scroll down to “Roles and Features” from task drop down
4. On “Add Role or Feature Wizard” dialog, click down to “Features” in the list of pages on the left
5. Expand “.NET 4.5” – if you haven’t installed it already, go back to “roles” and install it first
6. Under WCF Services” check the box “HTTP-Activation”. You can also add other types (TCP, Named Pipes, etc) if you will need them
7. Click “Install”
Two simple commands to either log off or restart the server from Windows PowerShell
Log off:
[code]logoff[/code]
Restart server:
[code]restart-computer[/code]
Your index is stored in \Solr\core\data
Eg. \Solr\collection1\data
If you delete the data folder or underlying folders “index” and “tlog”, it will delete your index.

A nicer way of achieving this, is by running the following HTTP command
[code]http://localhost:8983/solr/collection1/update?stream.body=<delete><query>*:*</query></delete>[/code]
I was about to set up some WCF services to handle POST requests to SolrNet and was digging around for solution. Goal was to post a string query to the web service and get JSON objects returned. This can be obtained pretty easily with an AJAX-enabled WCF Service and a bit of jQuery.
Actually you can have this example going in less than 3 minutes!
To serialize my objects to JSON I’m using a ToJson extension method written by Scott Gu. This makes it very easy to just use .ToJson() on your objects or collections, just like using ToString().
1. Create a new WCF Service Application and delete the files IService1.cs and Service1.svc
2. Right click your solution and Add New Item. Search for “Ajax enabled” and choose AJAX-enabled WCF Service.
3. Create a folder called “Helpers” in which you create a static class called “JsonHelper” with the following methods:
[csharp]
public static class JsonHelper
{
public static string ToJson(this object obj)
{
var serializer = new JavaScriptSerializer();
return serializer.Serialize(obj);
}
public static string ToJson(this object obj, int recursionDepth)
{
var serializer = new JavaScriptSerializer();
serializer.RecursionLimit = recursionDepth;
return serializer.Serialize(obj);
}
}
[/csharp]
The method takes your object, serializes it to JSON and returns it.
4. Open up your newly created AJAX-enabled WCF Service – Service1.svc and delete the method OperationContract method DoWork().
5. Create a new OperationContract method called HelloWorld() which will look like this:
[csharp]
[OperationContract]
public string HelloWorld(string personName)
{
return (new HelloWorldWrapper
{
Response = string.Format("Hello, {0}", personName),
Error = "",
TimeExecuted = DateTime.Now.ToString(CultureInfo.InvariantCulture)
}).ToJson();
}
[/csharp]
6. Create a wrapper class for your Hello World method, which we will create a new object of, serialize to JSON and return.
[csharp]
public class HelloWorldWrapper
{
public string Response;
public string TimeExecuted;
public string Error;
}
[/csharp]
Now you are actually done, but lets test the service. For that we’ll need a HTML page where we execute some jQuery and call our web service. Note that this service will be hosted on a IIS, where as your your front-end call can be on what ever server and site you want.
Right click your project and Add New Item. Create a Web Form for the ease of it.
In the head section insert:
[js]
<script src="http://ajax.googleapis.com/ajax/libs/jquery/1.10.2/jquery.min.js"></script>
<script>
var personNameVar = "Paul";
var dataIn = ‘{‘ + ‘"personName":"’ + personNameVar + ‘"}’;
$.ajax({
url: "/Service1.svc/HelloWorld",
type: "POST",
contentType: "application/json; charset=utf-8",
data: dataIn,
dataType: "json",
success: function (data) {
var object = JSON.parse(data.d);
if (object.Error == ”) {
//Alert the persons name
alert(object.Response);
}
},
error: function (error) {
alert("Error: " + error.Error);
}
});
</script>
[/js]
We are making an AJAX-call to our web service, located at “/Service1.svc/HelloWorld”, sending a post request in JSON format, containing the string personName. In our success function we receive our JSON serialized object and get the Reponse string returned in a alert box.
CTRL+SHIFT+B your project, right click HelloWorld.aspx and “View in Browser”.
For the lazy ones i made a Visual Studio 2012 project on .NET 4.5 framework containing the example. Download: Ajax WCF Test
Solr HTTP admin interface is per default unprotected and can be accessed by everyone.
To secure the interface with HTTP web authentication follow these steps.
Open:
[shell]C:\Tomcat\webapps\solr\WEB-INF\web.xml[/shell]
After:
[xml]<web-app xmlns="http://java.sun.com/xml/ns/javaee"
xmlns:xsi="http://www.w3.org/2001/XMLSchema-instance"
xsi:schemaLocation="http://java.sun.com/xml/ns/javaee http://java.sun.com/xml/ns/javaee/web-app_2_5.xsd"
version="2.5"
metadata-complete="true">[/xml]
Insert:
[xml]<security-constraint>
<web-resource-collection>
<web-resource-name>
Solr Lockdown
</web-resource-name>
<url-pattern>/</url-pattern>
</web-resource-collection>
<auth-constraint>
<role-name>solr_admin</role-name>
<role-name>admin</role-name>
</auth-constraint>
</security-constraint>
<login-config>
<auth-method>BASIC</auth-method>
<realm-name>Solr</realm-name>
</login-config>
<security-role>
<description>solr users</description>
</security-role>[/xml]
Open:
[shell]C:\Tomcat\conf\tomcat-users.xml[/shell]
Inside [xml]<tomcat-users> </tomcat-users>[/xml] insert:
[xml]<user name="myUsername" password="myPassword" roles="admin-gui,manager-gui,solr_admin"></user>[/xml]
It’s a good idea to add a .gitignore file to your Git-repository, to keep Git from keeping track of certain files and/or folders. This could be Visual Studio debug/build files, etc.
The problem in Windows however, is that you can’t just create a text file and rename it to “.gitignore”, as you’ll see the error:

A little trick, is to create a text file and rename it to:
[code].gitignore.[/code]
Windows now lets you create the file.
Here’s a sample .gitignore, which tells Git to ignore the most common files not needed in the repository.
Place the file in your Git-repositories root directory (/projectname/.gitignore).
[code]
## Ignore Visual Studio temporary files, build results, and
## files generated by popular Visual Studio add-ons.
# User-specific files
*.suo
*.user
*.sln.docstates
# Build results
[Dd]ebug/
[Rr]elease/
x64/
build/
#[Bb]in/ #(Keep "bin" folder in repo. Uncomment to remove)
[Oo]bj/
# Enable "build/" folder in the NuGet Packages folder since NuGet packages use it for MSBuild targets
!packages/*/build/
# MSTest test Results
[Tt]est[Rr]esult*/
[Bb]uild[Ll]og.*
*_i.c
*_p.c
*.ilk
*.meta
*.obj
*.pch
*.pdb
*.pgc
*.pgd
*.rsp
*.sbr
*.tlb
*.tli
*.tlh
*.tmp
*.tmp_proj
*.log
*.vspscc
*.vssscc
.builds
*.pidb
*.scc
# Visual C++ cache files
ipch/
*.aps
*.ncb
*.opensdf
*.sdf
*.cachefile
# Visual Studio profiler
*.psess
*.vsp
*.vspx
# Guidance Automation Toolkit
*.gpState
# ReSharper is a .NET coding add-in
_ReSharper*/
*.[Rr]e[Ss]harper
# TeamCity is a build add-in
_TeamCity*
# DotCover is a Code Coverage Tool
*.dotCover
# NCrunch
*.ncrunch*
.*crunch*.local.xml
# Installshield output folder
[Ee]xpress/
# DocProject is a documentation generator add-in
DocProject/buildhelp/
DocProject/Help/*.HxT
DocProject/Help/*.HxC
DocProject/Help/*.hhc
DocProject/Help/*.hhk
DocProject/Help/*.hhp
DocProject/Help/Html2
DocProject/Help/html
# Click-Once directory
publish/
# Publish Web Output
*.Publish.xml
*.pubxml
# NuGet Packages Directory
## TODO: If you have NuGet Package Restore enabled, uncomment the next line
#packages/
# Windows Azure Build Output
csx
*.build.csdef
# Windows Store app package directory
AppPackages/
# Others
sql/
*.Cache
ClientBin/
[Ss]tyle[Cc]op.*
~$*
*~
*.dbmdl
*.[Pp]ublish.xml
*.pfx
*.publishsettings
# RIA/Silverlight projects
Generated_Code/
# Backup & report files from converting an old project file to a newer
# Visual Studio version. Backup files are not needed, because we have git ;-)
_UpgradeReport_Files/
Backup*/
UpgradeLog*.XML
UpgradeLog*.htm
# SQL Server files
App_Data/*.mdf
App_Data/*.ldf
# =========================
# Windows detritus
# =========================
# Windows image file caches
Thumbs.db
ehthumbs.db
# Folder config file
Desktop.ini
# Recycle Bin used on file shares
$RECYCLE.BIN/
# Mac crap
.DS_Store
[/code]
After setting Solr DataImportHandler up and trying to fetch data from SQL Server via the HTTP API (http://localhost:8080/solr/dataimport?command=full-import) I got an error response back, telling all changes had been rolled back.
[code]
<response>
<lst name="responseHeader">
<int name="status">0</int>
<int name="QTime">7</int>
</lst>
<lst name="initArgs">
</lst><lst name="defaults">
<str name="config">data-config.xml</str>
</lst>
<str name="command">full-import</str>
<str name="status">idle</str>
<str name="importResponse"></str>
<lst name="statusMessages">
<str name="Time Elapsed">0:1:19.495</str>
<str name="Total Requests made to DataSource">1</str>
<str name="Total Rows Fetched">0</str>
<str name="Total Documents Processed">0</str>
<str name="Total Documents Skipped">0</str>
<str name="Full Dump Started">2013-08-14 11:20:59</str>
<str name="">Indexing failed. Rolled back all changes.</str>
<str name="Rolledback">2013-08-14 11:21:28</str>
</lst>
<str name="WARNING">
This response format is experimental. It is likely to change in the future.
</str>
</response>
[/code]
The Catalina log didn’t tell me anything useful, but checking “Logging” in http://localhost:8080/solr/ threw:
[code]
WARN SimplePropertiesWriter Unable to read: dataimport.properties
[/code]
It simply says that Solr is unable to read the file dataimport.properties.
The file is not a part of the standard Solr package and is not created automatically.
To fix this warning, simply created an empty file called “dataimport.properties” in your Solr conf directory, eg. /Solr/collection1/conf/ and make sure Apache has write access to it.
Getting these error messages in Apache Solr administration interface when you tab logging?
Well, it’s most likely because you are using the example solrconfig.xml located in \Solr\Collection1\conf\solrconfig.xml.
Simply modify or out comment the following lines:
[code]
<lib dir="../../../contrib/extraction/lib" regex=".*\.jar"></lib>
<lib dir="../../../dist/" regex="solr-cell-\d.*\.jar"></lib>
<lib dir="../../../contrib/clustering/lib/" regex=".*\.jar"></lib>
<lib dir="../../../dist/" regex="solr-clustering-\d.*\.jar"></lib>
<lib dir="../../../contrib/langid/lib/" regex=".*\.jar"></lib>
<lib dir="../../../dist/" regex="solr-langid-\d.*\.jar"></lib>
<lib dir="../../../contrib/velocity/lib" regex=".*\.jar"></lib>
<lib dir="../../../dist/" regex="solr-velocity-\d.*\.jar"></lib>
[/code]
You can find a issue ticket about this problem at Solr issue tracker.
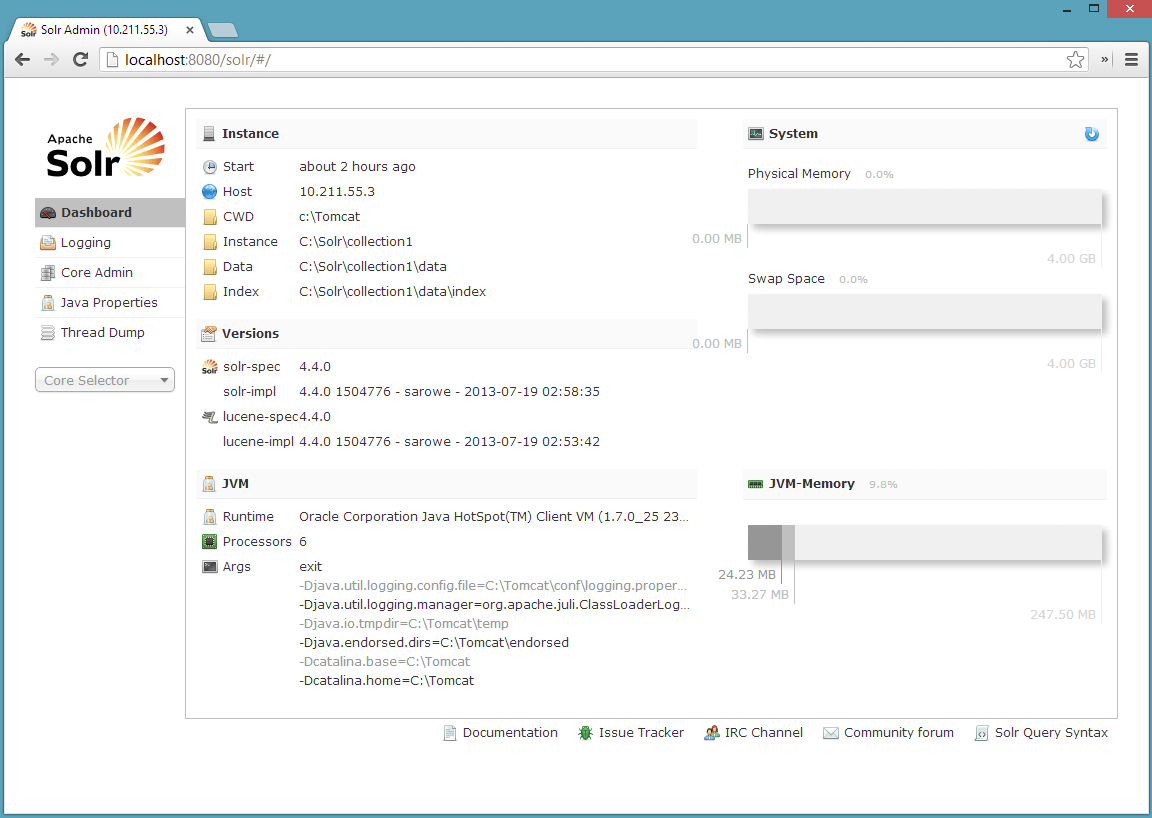
Installing and getting Solr up and running is straight forward, as long as you follow these simple steps. I ran into problems myself trying to get Solr starting up under Tomcat, even after reading several posts explaining how to, which is why I wrote this post, explaining all the necessary steps. Feel free to make a comment, if you have any questions or run into problems.
1. Download Apache Tomcat from Apache Software Foundation. I downloaded and installed Tomcat 7.0.42 “32-bit/64-bit Windows Service Installer” under the location c:\Tomcat\
2. Download the latest version of “Solr”. I downloaded Solr 4.4.0.
– Open solr-4.4.0.zip, navigate to \example\solr and extract the directories and files to c:\solr\, so it contains; bin, collection1, README.txt, solr.xml and zoo.cfg
– Again in solr-4.4.0.zip navigate to \example\lib and extract all the jar-files into c:\Tomcat\lib\. Repeat the same procedure with the jar-files in \examples\lib\ext.
– In solr-4.4.0.zip navigate to \example\webapps and extract solr.war to c:\Tomcat\webapps\. If the file is called solr-versionNumber.war, rename it to solr.war
3. In C:\Tomcat\conf\Catalina\localhost create a file called “solr.xml” with following content, where you specify Solr docBase “c:/Tomcat/webapps/solr.war” and enviroment value “/Tomcat/webapps/”.
[xml]
<?xml version="1.0" encoding="UTF-8"?>
<context docBase="c:/Tomcat/webapps/solr.war" debug="0" crossContext="true" >
<environment name="solr/home" type="java.lang.String" value="/Tomcat/webapps/" override="true"></environment>
</context>
[/xml]
4. Open up C:\Tomcat\webapps\solr\WEB-INF\web.xml and uncomment the following and replace “/put/your/solr/home/here” with your solr location
[xml]
<env-entry>
<env-entry-name>solr/home</env-entry-name>
<env-entry-value>C:\Solr</env-entry-value>
<env-entry-type>java.lang.String</env-entry-type>
</env-entry>
[/xml]
During these steps you might have to stop and start your Apache Tomcat to be able to write to the files and reload the changes. To stop/start Apache Tomcat, click the Apache icon in the task bar and click “Stop service / Start service”.

You should now be able to navigate to http://localhost:8080/solr/ and get the Solr admin site, presuming you installed Apache Tomcat on port 8080 (as per default)
If you run into problems, you can view the Catalina log located in c:\Tomcat\logs\catalina.date.log.
